To assemble your telescopic ladder, we will start by ensuring that the rails, hinges, rungs, and locks are not damaged and clean the equipment. Next, we will lay the ladder on the ground made of a firm and level surface and make a 75-degree angle with the help of the 1 in 4 rule. At this point, you need to remove the strap, extend the ladder, and check all lock indicators. While climbing, make sure there are three points of contact and stay centered. When you finish, you need to make sure to retract, clean, inspect, and store the ladder according to the user’s book. All the steps above are optional, but if you want more information, you can follow them closely.
Table of Contents
Key Takeaways
- Before using a telescoping ladder inspect for damage, loose parts, clean rungs, and proper functioning of all locks.
- Always set up telescoping ladder on level and stable surface free of debris, on grass or gravel or slippery surfaces.
- Set the ladder at the angle of approximately 75 degrees using the one-in-four positioning rule.
- Extend each section of the telescoping ladder one after another while keeping hand away from the place where it could get pinched and check that all locking devices are engaged.
- Always climb the ladder with three points of contact at a time, always keep your body centered in the middle of the ladder and remember to retract, clean, inspect, and store the telescoping ladder properly.
Check telescopic ladder before setup
Before assembling your telescopic ladder, check for signs of wear and tear, damaged parts, or defect mechanisms, and ensure that each locking mechanism is properly engaged.
Make sure there are no cracks or loose on the hinges, joints, release buttons or levers, and locking indicators. Remove any substances or debris that might decrease the friction on the rungs while we climb.
Check the hinges, joints, and locks for damage, and make sure that all its rungs are clean and free from slippery substances.
Check if the feet are intact and have durable rubber at their ends. We should also ensure that the ladder has been tested and certified according to the EN131-6 standard; some ladders have been designed with large rungs and a safety closure.
We should raise and lower the ladder slowly and check every section for ease of motion. If we find defective parts, improper locking, or any other concerns, we should not use the ladder until it has been serviced or repaired.
Place the Ladder on Firm, Level Ground
Select an appropriate clean, firm and level surface free from debris, clutter or other material that can reduce the load bearing capacity of the ladder and cause instability. We must check the ground for cracks, gaps, or any weak spots before we place the ladder on it.
The ladder should not be placed on grass, wet ground, gravel or uneven surfaces where the feet may sink or shift. A non-level surface should be leveled using an appropriate leveling device or stabilizers (as specified by the manufacturer). Do not use objects such as boxes or boards to stabilize the ladder feet.
After positioning the ladder on the desired location, we need to give the ladder a gentle shake to confirm that it is stable and will not move. The ladder’s footings must be checked for stability throughout the duration of the use or until it is moved to another location.
Position the telescopic ladder at a 75-degree angle
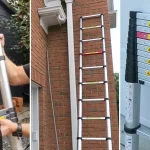
We’ll position the telescopic ladder at a 75-degree angle, placing its base one foot away from the wall for every four feet of ladder height—the 1-in-4 rule. This will minimize the possibility of the equipment tilting or toppling as we climb.
Before our climb, ensure that
- The base of the telescopic ladder is on a firm and clear surface,
- The rails are in contact with the wall, and
- The ladder has integrated wall spacers.
Measure the distance from the base of the equipment to its top support, and adjust the base until we have a 1:4 ratio.
The telescopic ladder should be placed away from cluttered objects, outside the wet zones, on a non-slip floor, and on a level and stable surface. We will give the equipment a gentle shake to check if it can move from side to side. If it does, we will re-position the ladder.
In addition, we should ensure that every locking mechanism is securely engaged before climbing, and we should not add any extension ladder on the telescopic one.
Extend Each Ladder Section Carefully
Remove the securing strap and place the ladder on a flat surface with ample space around it.
Before we start to extend the ladder, we have to make sure that the area around the ladder is clear of any obstacles, people, and materials.
We have to check the manufacturer’s instructions to see how we have to extend it. The mechanism can be different for every model, which means we have to take special care in that step.
The lowest rung or section should be extended by us one by one until we reach the desired height. We have to do it slowly and deliberately, not by forcing and pulling the tubes.
We also have to check if the visual indicator of the extended section is locked. Once we are done with it, we have to proceed to the next one. Our hands also have to be kept away from the ladder’s pinch points when we raise it. And we should not rush and do everything deliberately and carefully.
When we reach the needed height, we have to stop and prepare for the next step.
Check Every Rung Lock Before Climbing
Before climbing, we should check every rung to make sure it is fully extended and locked in place. This is important to avoid a rung collapsing while we are working on it.
Inspect every rung before climbing to confirm full extension and secure locking, preventing unexpected collapse while working.
We will start inspecting every rung from the bottom up, making sure the indicator is showing an engaged position, we will also look over every other visible locking mechanism for cracking, looseness, bending or other damage.
- Check every rung’s visual indicator before using.
- Make sure that no rungs are partially extended.
- Immediately stop using the ladder if a lock appears damaged.
If a rung is unable to be locked, we will refrain from using the ladder and have it serviced or replaced as soon as possible.
We will include this procedure on every setup, even if the ladder appeared fine from the last time it was used. This way we can be sure the locking mechanism will hold our weight, and keep us from suffering an equipment failure related accident.
Climb Safely With Three-Point Contact
While climbing, we will use three-point contact: two hands and one foot or two feet and one hand to ensure balance and avoid falls while working. We will maintain body position centered between the ladder rails to ensure balance and reduce the possibility of accidents while climbing the ladder.
We will stop and make sure that all the three points (hands or feet) are in place before we attempt to change the position of the other points. We will not climb the ladder leaning back or sideways to make it possible to reach tools or other items as such a position may cause loss of balance and lead to fall from the ladder.
While climbing the ladder, we will climb slowly, keeping the body balanced and use one foot or hand at a time to climb up or down the ladder. By doing so, we will maintain contact with the ladder rails to ensure there are no sudden movements that can cause accidents.
Retract, Clean, and Store the Ladder
After completing the task, we will retract the ladder and place it in a storage location. We will open the locking mechanism and collapse all of the ladder’s rails one by one until we reach the end. We will make sure not to pinch our fingers while unlocking the ladder and closing the rails.
We will use a dry cloth to wipe the ladder’s rails and make sure that there is no dust or dirt on it. It may obstruct the locking mechanism of the ladder.
Wipe the ladder clean to ensure that there is no dust or dirt on it, which may obstruct the locking mechanism
Before storing the ladder, we will inspect it to make sure that there are no damaged parts. Most notably, we will check the ladder’s straps and locking mechanisms for any signs of wear and tear.
Before storing the ladder, inspect it for any signs of wear and tear
We will store the ladder in a dry place with a stable temperature. Storing the ladder in a dry place will prevent it from corroding. If the ladder has some damaged parts, like frayed straps or faulty locks, we will have to service it before the next use.
We won’t leave the ladder exposed to moisture or extreme temperatures, which can cause corrosion and even weaken the structure of the telescopic ladder.
We will store the ladder vertically or horizontally to ensure that it does not tip over. We will make sure to store the ladder in a stable position.
Frequently Asked Questions
Can Telescopic ladders be used on stairs or uneven surfaces?
Telescopic ladders should not be used on stairs or uneven surfaces; we suggest using telescopic ladders on even and stable surfaces, and always follow the instruction manual provided by the manufacturer. We recommend using a different ladder accessory if you need to use a ladder on stairs or uneven ground.
What is the maximum weight capacity of a telescoping ladder?
Depending on the size and brand, most telescoping ladders have a maximum weight capacity between 250-330 pounds. We will check the information provided on our ladder, and remember to take into account our clothes and tools when climbing. We must not exceed the recommended weight limit specified by the manufacturer.
Are telescoping ladders suitable for use outdoors in high winds?
No, we must not use telescoping ladders outdoors when it is windy. We must wait until the wind has died down before setting up the ladder. We must always set up telescoping ladders on a stable and level surface. We must make sure our ladder is correctly secured and follow the manufacturer’s advice before climbing our ladder.
How high can a telescoping ladder reach?
We can climb up to approximately 12-15 feet with most telescoping ladders. We must always check the maximum height and weight our ladder can support, and the angle of the ladder in relation to the surface before climbing. This will vary according to the brand and size of our ladder.
What accessories are available for telescoping ladders?
We will try to keep our list of accessories for telescoping ladders conveniently simple. Some of the many accessories available to us are stabilizing bars for our ladder, wall stand-offs, ladder levelers, carrying bags for our ladder, and tool trays. We must first obtain the information provided by the manufacturer of our telescoping ladder, as fittings vary. We will not use any accessories not specified by the manufacturer, as they may be unsafe.
Conclusion
The correct way of setting up a telescopic ladders is easy to spot when their safety is prioritized. By doing so, the most frequent accidents are prevented. Firstly, the ladder needs to be examined. Secondly, the floor needs to be firm enough, it will support the ladder. The third step is to place it at the appropriate angle, and fourthly, the installation process of each segment must be done carefully. After these steps, double-checking all locks is necessary, and a worker must remember the rule of three points of contact. It will ensure that there will be no tragic slips on the way up or down.

DIY enthusiast and editor of Best Ladders.

Very helpful, thanks. Looking for one mainly for loft and gutter jobs.